|
|
|
Member Login
Scorecard
| Tee |
Total Yardage |
Men's Rating |
Men's Slope |
Women's Rating |
Women's Slope |
| Black |
7049 |
74.5 |
136 |
~ |
~ |
| Men's Hybrid |
6832 |
73.1 |
132 |
~ |
~ |
| Blue |
6613 / 6581 |
71.9 |
128 |
~ |
~ |
| White |
6032 |
69.4 |
122 |
75.0 |
130 |
| Ladies' Hybrid |
5626 |
~ |
~ |
72.5 |
126 |
| Yellow |
5272 |
70.4 |
121 |
~ |
~ |
|
_1.aspx?width=200&height=46) |
 |
|
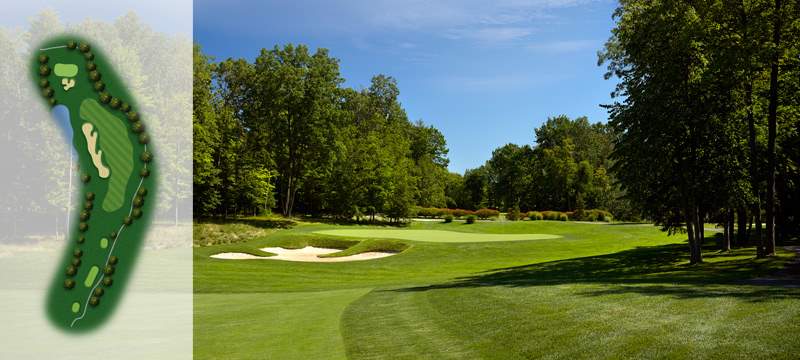
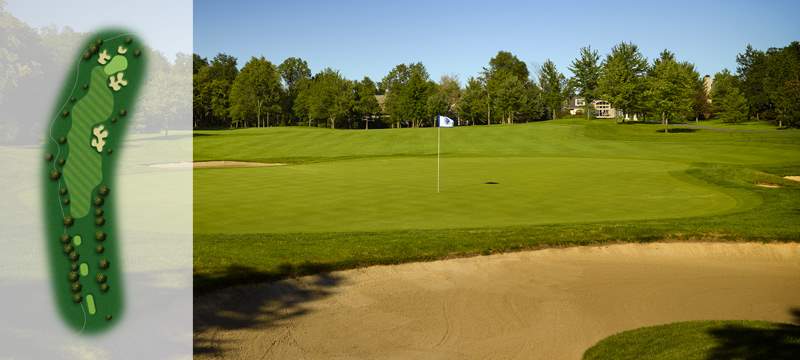
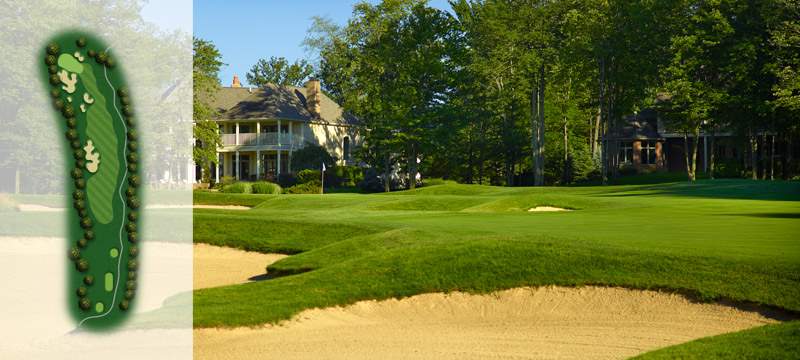
The starting hole at Barrington is a medium length, dogleg left par 4. Tee shots that are hit well enough to carry the large bunker will set up a short approach to a relatively shallow green. Be sure to avoid the deep faced green side bunker as shots hit there will most likely lead to bogey or worse.
|
| Category |
Yards |
Par |
Men's HCP |
Women's HCP |
| Back |
407 |
4 |
9 |
11 |
| Men's Hybrid |
407 |
4 |
9 |
11 |
| Blue |
364 |
4 |
9 |
11 |
| White |
345 |
4 |
9 |
11 |
| Ladies Hybrid |
298 |
4 |
9 |
11 |
| Yellow |
298 |
4 |
9 |
11 |
|
 |
Hole 2
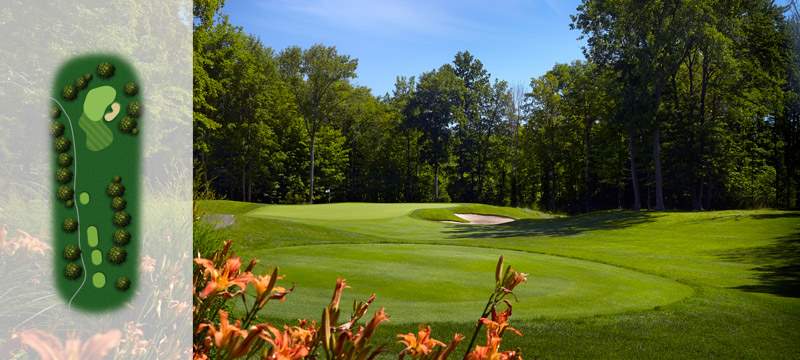
The second hole is the shortest of all the par 3’s at Barrington Golf Club. Club selection is at a premium, and any pin placed near the bunker or back of the green should be avoided. Shots hit over the green will most likely lead to a high score.
|
| Category |
Yards |
Par |
Men's HCP |
Women's HCP |
| Back |
163 |
3 |
17 |
17 |
| Men's Hybrid |
163 |
3 |
17 |
17 |
| Blue |
158/144 |
3 |
17 |
17 |
| White |
125 |
3 |
17 |
17 |
| Ladies Hybrid |
119 |
3 |
17 |
17 |
| Yellow |
119 |
3 |
17 |
17 |
|
 |
Hole 3
The third hole is a nice birdie opportunity if you stay out of the trees that align both sides of the fairway. The ideal shot is a left-to-right shot off the tee and then again for the second shot. There is a large bunker awaiting any shot that comes up short.
|
| Category |
Yards |
Par |
Men's HCP |
Women's HCP |
| Back |
536 |
5 |
3 |
3 |
| Men's Hybrid |
517 |
5 |
3 |
3 |
| Blue |
517 |
5 |
3 |
3 |
| White |
477 |
5 |
3 |
3 |
| Ladies Hybrid |
477 |
5 |
3 |
3 |
| Yellow |
397 |
5 |
3 |
3 |
|
 |
Hole 4
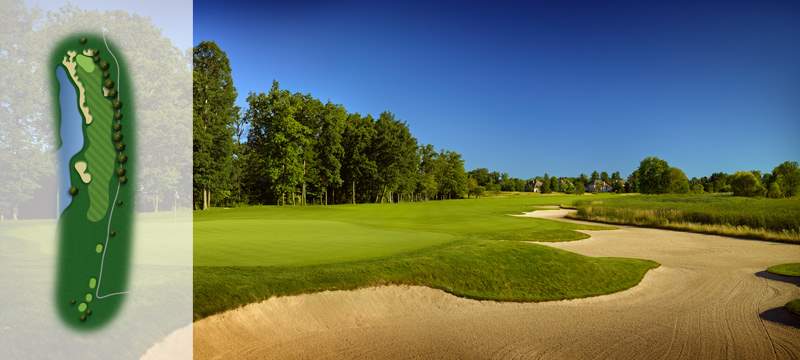
Many golfers agree the golf course starts here! The tee shot off of number 4 gives you a couple of options. If you hit the ball long off the tee, you can challenge the large bunker on the left side and, if successful, have a short wedge to a generous green. The other option off the tee is to play right of the bunker, which leaves you a longer approach to the green. A deep, precarious bunker will catch balls that are hit to the right of the green.
|
| Category |
Yards |
Par |
Men's HCP |
Women's HCP |
| Back |
427 |
4 |
11 |
7 |
| Men's Hybrid |
427 |
4 |
11 |
7 |
| Blue |
392 |
4 |
11 |
7 |
| White |
362 |
4 |
11 |
7 |
| Ladies Hybrid |
362 |
4 |
11 |
7 |
| Yellow |
335 |
4 |
11 |
7 |
|
 |
Hole 5
Although short on length, this par 5 is by far the most dangerous on the course. Your tee shot must contend with a forced carry over a pond onto a generous fairway. If you hit your tee shot well, you may be tempted to go for the green in two. However, another pond guards the front of the green. Shots that carry over the green usually end up under large trees or in a bunker behind the center of the green. The smart shot is usually laying up to the right side of the green, getting your par, and going to the next hole.
|
| Category |
Yards |
Par |
Men's HCP |
Women's HCP |
| Back |
492 |
5 |
1 |
1 |
| Men's Hybrid |
458 |
5 |
1 |
1 |
| Blue |
458 |
5 |
1 |
1 |
| White |
390 |
5 |
1 |
1 |
| Ladies Hybrid |
383 |
5 |
1 |
1 |
| Yellow |
383 |
5 |
1 |
1 |
|
 |
Hole 6
This par three can be an intimidating hole, especially on windy days. A large pond guards the front and left sides of the green. Nicklaus left a bailout to the right of the green. If you make par at #6, that is usually good enough to win the hole!
|
| Category |
Yards |
Par |
Men's HCP |
Women's HCP |
| Back |
194 |
3 |
15 |
15 |
| Men's Hybrid |
179 |
3 |
15 |
15 |
| Blue |
179 |
3 |
15 |
15 |
| White |
135 |
3 |
15 |
15 |
| Ladies Hybrid |
135 |
3 |
15 |
15 |
| Yellow |
100 |
3 |
15 |
15 |
|
 |
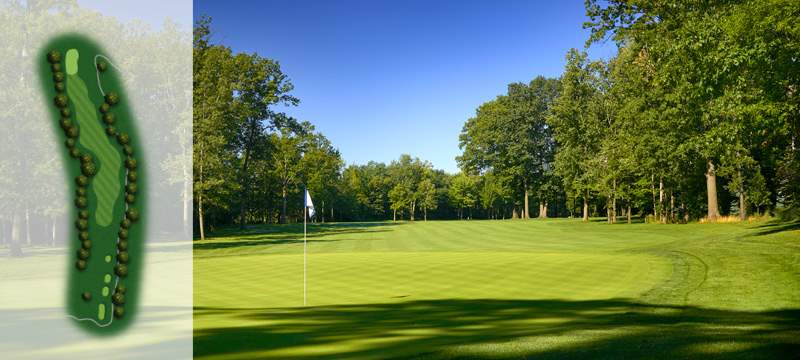
Hole 7
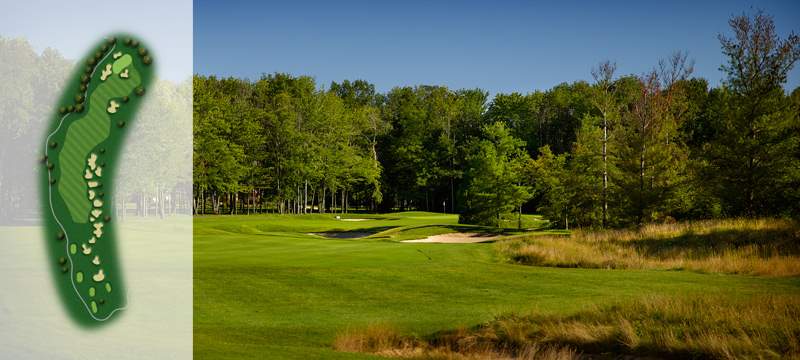
The tee shot is crucial and must be right of center of the fairway for the best approach to the green. A series of bunkers on the right side makes this a daunting task. The approach to the green is well protected by bunkers, which makes accuracy a premium.
|
| Category |
Yards |
Par |
Men's HCP |
Women's HCP |
| Back |
420 |
4 |
7 |
9 |
| Men's Hybrid |
420 |
4 |
7 |
9 |
| Blue |
397 |
4 |
7 |
9 |
| White |
370 |
4 |
7 |
9 |
| Ladies Hybrid |
323 |
4 |
7 |
9 |
| Yellow |
323 |
4 |
7 |
9 |
|
 |
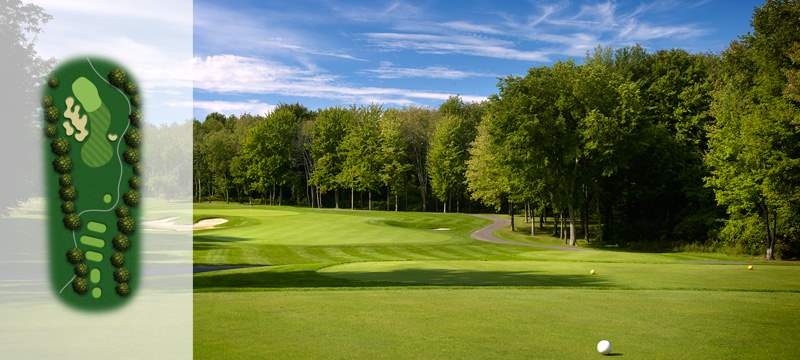
Hole 8
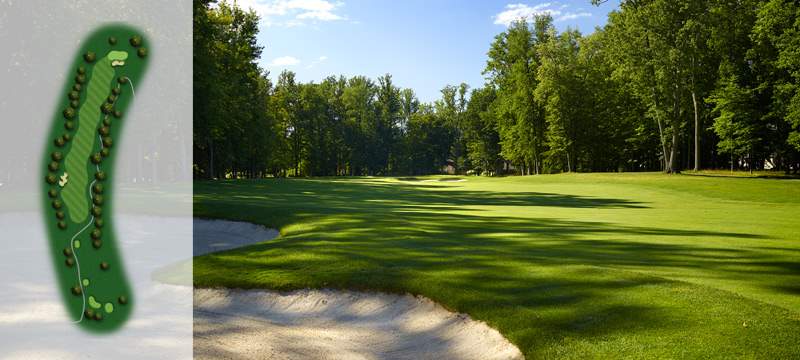
This seems like a short, benign hole. The tee shot requires a slight left-to-right shot. Be careful to avoid the deep fairway bunkers on the right. If your tee shot ends up left, a series of trees can make the approach shot difficult. This is a great birdie opportunity if your tee shot ends up in the fairway.
|
| Category |
Yards |
Par |
Men's HCP |
Women's HCP |
| Back |
376 |
4 |
13 |
13 |
| Men's Hybrid |
359 |
4 |
13 |
13 |
| Blue |
359 |
4 |
13 |
13 |
| White |
324 |
4 |
13 |
13 |
| Ladies Hybrid |
324 |
4 |
13 |
13 |
| Yellow |
272 |
4 |
13 |
13 |
|
 |
Hole 9
This long, beautiful par four requires distance and accuracy on both the tee shot and approach. Balls hit to the right off the tee may find the OB, and shots hit left will find the bunker or water hazard. The approach shot is generally into a prevailing wind and plays much longer than the actual yardage.
|
| Category |
Yards |
Par |
Men's HCP |
Women's HCP |
| Back |
449 |
4 |
5 |
5 |
| Men's Hybrid |
432 |
4 |
5 |
5 |
| Blue |
432 |
4 |
5 |
5 |
| White |
405 |
4 |
5 |
5 |
| Ladies Hybrid |
341 |
4 |
5 |
5 |
| Yellow |
341 |
4 |
5 |
5 |
|
 |
Hole 10
This hole offers no let up after the difficult ninth. With water on the right and OB left, the only option is a straight drive. Your second shot will be long to mid-iron into a very thin green. Be careful to avoid the large deep-faced bunker to the right of the green.
|
| Category |
Yards |
Par |
Men's HCP |
Women's HCP |
| Back |
453 |
4 |
10 |
10 |
| Men's Hybrid |
453 |
4 |
10 |
10 |
| Blue |
423 |
4 |
10 |
10 |
| White |
388 |
4 |
10 |
10 |
| Ladies Hybrid |
388 |
4 |
10 |
10 |
| Yellow |
347 |
4 |
10 |
10 |
|
 |
Hole 11
This is the first of two beautiful par 5’s on the back nine. Be careful on the drive to straddle the fairway bunker, because anything hit to the right side of the fairway will probably find the rough. The second shot is either a routine lay up to about the 100 yard marker, or you can choose to challenge the lake on the left and go for the green in two. The bail out here is to the right of the green, but you must avoid the large bunker on the right of the green.
|
| Category |
Yards |
Par |
Men's HCP |
Women's HCP |
| Back |
549 |
5 |
2 |
2 |
| Men's Hybrid |
549 |
5 |
2 |
2 |
| Blue |
522 |
5 |
2 |
2 |
| White |
498 |
5 |
2 |
2 |
| Ladies Hybrid |
454 |
5 |
2 |
2 |
| Yellow |
454 |
5 |
2 |
2 |
|
 |
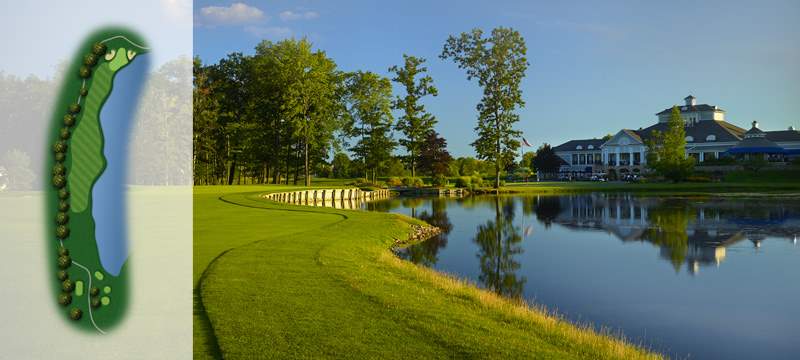
Hole 12
This is Barrington Golf Club’s Signature hole. It is a medium length, island par 3 surrounded by water. There is little bail out here, so pick the right club and hit it solid!
|
| Category |
Yards |
Par |
Men's HCP |
Women's HCP |
| Back |
186 |
3 |
14 |
14 |
| Men's Hybrid |
155 |
3 |
14 |
14 |
| Blue |
155 |
3 |
14 |
14 |
| White |
140 |
3 |
14 |
14 |
| Ladies Hybrid |
140 |
3 |
14 |
14 |
| Yellow |
100 |
3 |
14 |
14 |
|
 |
Hole 13
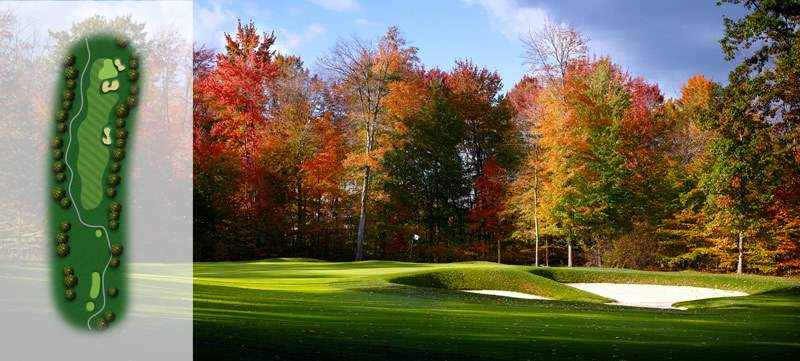
This short par 4 gives the player a chance at a routine par or even a birdie if your tee shot finds the fairway. Be sure to avoid the bunker on the right of the fairway and short of the green.
|
| Category |
Yards |
Par |
Men's HCP |
Women's HCP |
| Back |
351 |
4 |
16 |
16 |
| Men's Hybrid |
351 |
4 |
16 |
16 |
| Blue |
329 |
4 |
16 |
16 |
| White |
309 |
4 |
16 |
16 |
| Ladies Hybrid |
309 |
4 |
16 |
16 |
| Yellow |
245 |
4 |
16 |
16 |
|
 |
Hole 14
Perhaps the nicest hole on the golf course, this long par 5 requires nothing less than a straight tee shot. This hole gives the player many options. Be sure to notice where the pin location is, because that will dictate which side of the cross bunkers you need to land your lay-up shot. There are two very challenging pin locations – middle left between two bunkers and back right. Be careful not to get too greedy on your approach shot, as you will more than likely make a bogey or worse.
|
| Category |
Yards |
Par |
Men's HCP |
Women's HCP |
| Back |
529 |
5 |
4 |
4 |
| Men's Hybrid |
495 |
5 |
4 |
4 |
| Blue |
495 |
5 |
4 |
4 |
| White |
468 |
5 |
4 |
4 |
| Ladies Hybrid |
429 |
5 |
4 |
4 |
| Yellow |
429 |
5 |
4 |
4 |
|
 |
Hole 15
This hole plays much longer than the actual yardage due to the fact it is all uphill. The tee shot must squeeze between an enormous bunker on the left and a forest on the right. If you find the fairway, your second shot will play at least one extra club to a two-tiered green that is difficult to read.
|
| Category |
Yards |
Par |
Men's HCP |
Women's HCP |
| Back |
399 |
4 |
12 |
12 |
| Men's Hybrid |
399 |
4 |
12 |
12 |
| Blue |
365 |
4 |
12 |
12 |
| White |
350 |
4 |
12 |
12 |
| Ladies Hybrid |
312 |
4 |
12 |
12 |
| Yellow |
312 |
4 |
12 |
12 |
|
 |
Hole 16
This is the beginning of three fabulous finishing holes at Barrington. It is the longest par 3 on the course and leads to a fairly receptive green. The green is well protected on the left by a large bunker. If you miss on the right side, you will be faced with a green that runs away from you. Par is a terrific score on #16!
|
| Category |
Yards |
Par |
Men's HCP |
Women's HCP |
| Back |
219 |
3 |
18 |
18 |
| Men's Hybrid |
202 |
3 |
18 |
18 |
| Blue |
202/184 |
3 |
18 |
18 |
| White |
163 |
3 |
18 |
18 |
| Ladies Hybrid |
163 |
3 |
18 |
18 |
| Yellow |
148 |
3 |
18 |
18 |
|
 |
Hole 17
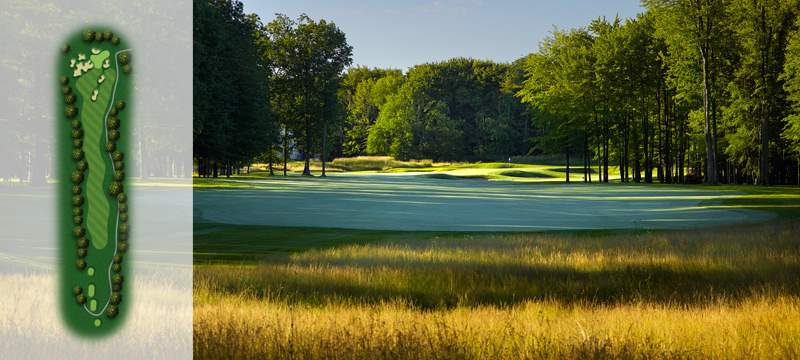
The seventeenth is the longest par four on the course and places a premium on the tee shot. A little too far left or right you are completely blocked out for your approach shot. A perfect tee shot will leave you with a long iron shot to a three-tiered green. There are no bunkers on this hole, but plenty of opportunities to find trouble.
|
| Category |
Yards |
Par |
Men's HCP |
Women's HCP |
| Back |
454 |
4 |
8 |
6 |
| Men's Hybrid |
435 |
4 |
8 |
6 |
| Blue |
435 |
4 |
8 |
6 |
| White |
388 |
4 |
8 |
6 |
| Ladies Hybrid |
354 |
4 |
8 |
6 |
| Yellow |
354 |
4 |
8 |
6 |
|
 |
Hole 18
One of the most picturesque holes in all of Ohio! It is also a hole you do not want to have to make a par on! With water all the way up the right side and out of bounds left, there is no bailout. If you find the fairway, your second shot will be a mid-iron. Anything hit to the right for your approach shot will find water while a left side shot has a good chance to find the greenside bunker.
|
| Category |
Yards |
Par |
Men's HCP |
Women's HCP |
| Back |
445 |
4 |
6 |
8 |
| Men's Hybrid |
431 |
4 |
6 |
8 |
| Blue |
431 |
4 |
6 |
8 |
| White |
395 |
4 |
6 |
8 |
| Ladies Hybrid |
315 |
4 |
6 |
8 |
| Yellow |
315 |
4 |
6 |
8 |
|
|